Stylish Retro Design
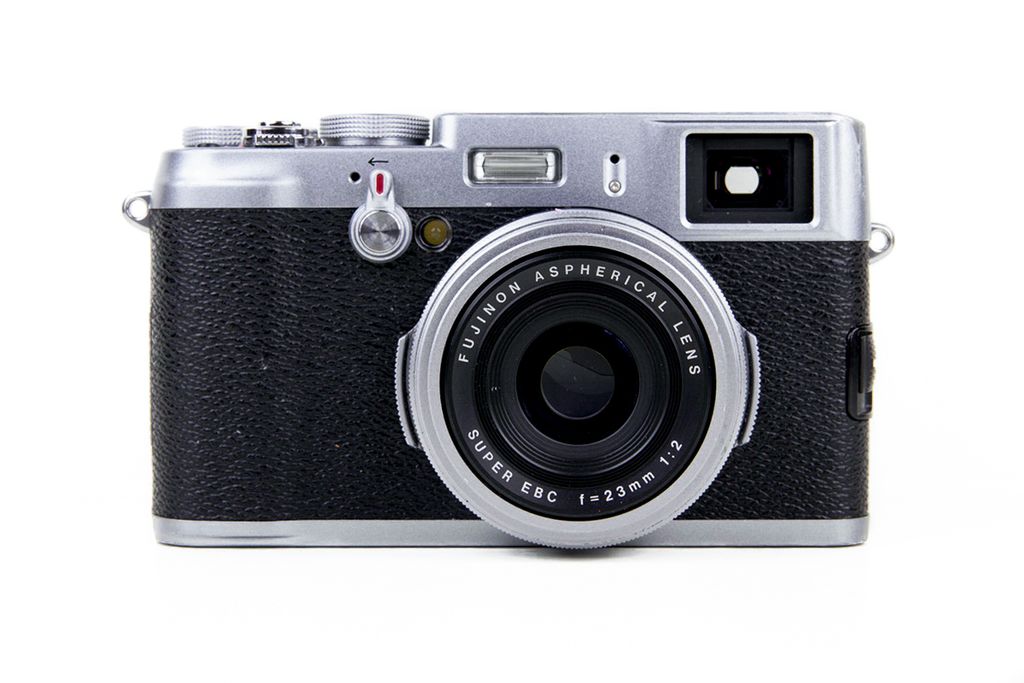
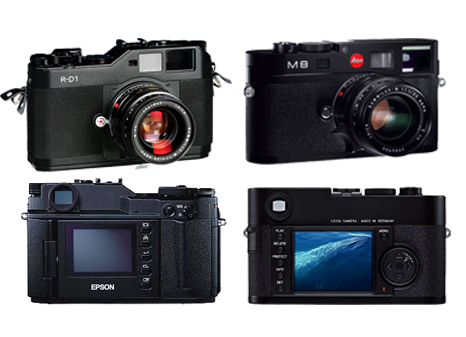
Are you tired of carrying around a heavy DSLR only using it for planned shots here and there but never for the fun of it and the love of photography? Are you still dreaming of a digital Contax G2? Do you remember the Epson R1? Is Leica M8 still overpriced to your taste? If YES, then Fujifilm X100 would be the best option for a second compact type of a camera to accompany your current bulky DSLR.
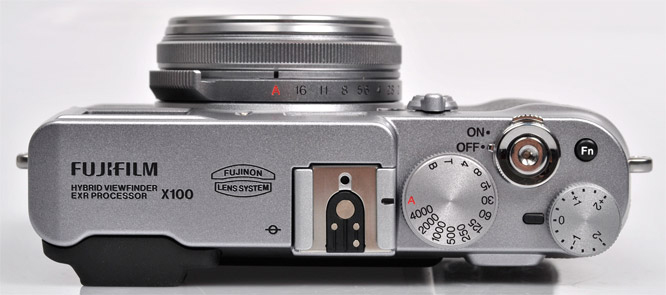
Although made of metal X100 is smaller and lighter than film and digital rangefinders it is often compared to which makes it perfect for carrying all day long around your neck. It is quite straightforward to use for a digital camera with an old school aperture ring on the lens and huge dials for exposure time and compensation on the right side of the top panel. ISO could be set trough the menu or by the Function (Fn) black button on top.
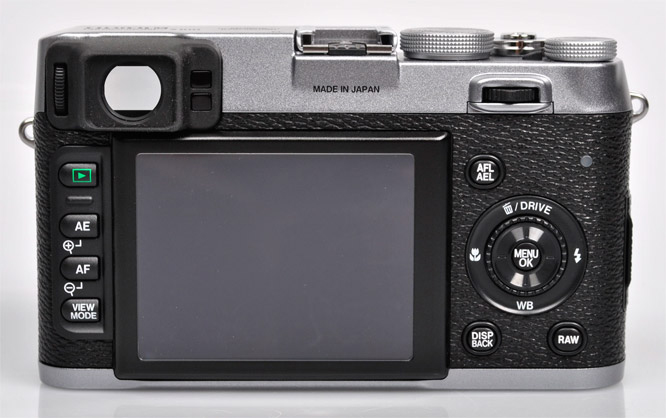
There are only 3 buttons at the back of the camera that deserve your attention. In the upper right corner there is a dial-like switch called “Command Control”. While reviewing images switching it left or right zooms in or out the center of the image. If you push it in it will zoom in on the focus point of the selected image. Quite convenient for judging sharpness of just captured image. Push it again to zoom back to 100%. The DISP/BACK is a real treasure for street/candid photography. Hold the button down for few seconds and the camera will go in silent mode, meaning no beep and shutter release sound will be heard and AF illumination light will be off. Nice right? The ‘RAW’ button allows you to turn on RAW image recording just for the next shot while shooting in JPG and vice versa.
In an age where camera manufacturers strive to make cameras as automatic, fast and easy to use Fuji X100 was deliberately designed to slow things down, make you learn photography fundamentals. This proved to be a tough task for many and in 2014 Fujifilm as a gesture of good will decided to offer for downloading firmware version 2.10 which improved AF speed with about 30% and added new features like focus peaking, which makes an upgrade to X100s unnecessary.
Besides the latest software as a final note before reading the full review I strongly advise you to buy X100 with a serial number (SN) 21 and up or the black limited edition, which are both better built. Earlier batches (SN12 &13) could also be considered safe as long as you have original purchase receipt with a life time warranty.
Large & Bright Hybrid (OVF/EVF) Viewfinder
Image source: Amazon.com
The OVF
You have never used a film rangefinder before and you are very curious whether you can live with the idea of a viewfinder not seeing through the lens? You can always go to the first electronics store and find the latest Fuji X100 series camera and try it out for few minutes and…do this several days in a row but it`s quite a drastic change for a DSLR shooter and you will never feel 100% confident to buy it even if it is used. To get a better understanding of a non-TTL OVF you can buy a cheap disposable film camera and carefully shoot the pre-installed film. The viewfinder doesn`t see through the lens either and it`s all made of cheap plastic. Do not pay attention to the smaller size, lower brightness, sharpness and magnification of the viewfinder. Just focus on the idea of having your actual image shifting according to the relative position of the viewfinder towards the lens. I can accept this quirk and happily shoot even with this camera above as long as the image quality was the same as X100`s. Portability factor and the presence of a viewfinder are important to me. No need to say that you will be blown away when you look through the OVF of X100.
X100 sports the so-called reverse Galilean optical viewfinder (see image bellow). Behind the front window (lens) there is a shutter. When it is open the light (image) travels directly through the prism towards photographer`s eye. If the viewfinder switch lever at the front of the camera is flipped (EVF mode is on) the shutter is closed and the half mirror within the prism reflects an electronic image (beamed from a tiny LCD) towards the eyepiece. In optical mode (when the viewfinder shutter is open) you can choose to see your aperture, exposure time, ISO, AF point and other important settings projected by the same tiny LCD over the optical image in the half-mirror.
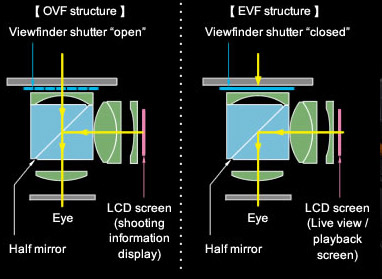
Image source: https://www.blogcdn.com/www.engadget.com/media/2010/12/x100-hybrid-viewfinder-1.jpg
The OVF will be used for at least 90% of your shooting occasions with the zone focusing technique I spoke about earlier. Since there is no real mirror in front of the sensor you won`t see any blackout during sequence of shots and be able to keep connection with your objects at all times.
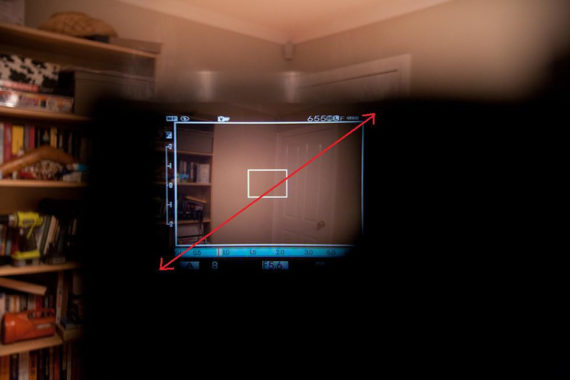
The hybrid viewfinder is bright and with a size approaching a full-frame DSLR. In comparison the more expensive, larger X-Pro 1 rangefinder has physically smaller and dimmer viewfinder with slightly wider field of view (objects look smaller than in real world). Use the following 2 photos below as actual representation of what your eye sees trough the viewfinder of both cameras. The OVF coverage of X100 is 130% since you are able to see outside the white framelines of the actual image.
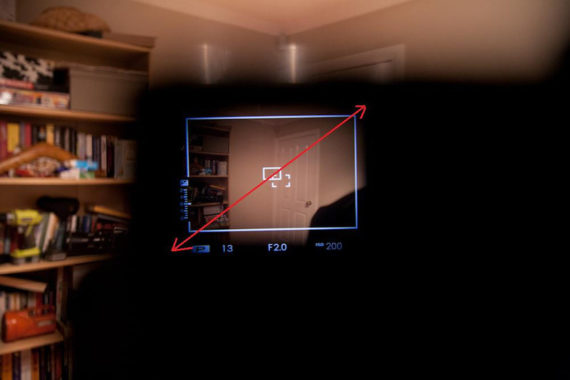
Note: More of the bookshelf and door is visible than trough X100`s viewfinder
Image source: http://www.fujix-forum.com/threads/x-pro1-viewfinder-vs-x100-viewfinder.3983/
OVF experience will be much more pleasant if you have your finder clear of all distractions by turning off the overlay information like white framelines, exposure settings and AF point. The camera was created as a rangefinder and as such use it without the extra bells and whistles as real photographers do for decades. There is nothing better than seen the world trough a large, clean and bright optical viewfinder. This is the closest you will get to a TTL VF of high-end DSLRs but in a much smaller and lighter package which is truly liberating.
The EVF
Displays exactly what the sensor is seeing through the lens without the needless white framelines. It is bright and very clear full-frame video LCD with sufficient resolution, good refresh rate and negligible delay that gets the job done pretty well.
Most common situations where you will prefer it to the OVF are:
- When shooting in macro mode (focusing distance less than 80cm) when the parallax effect is too great and the corrected white framelines cannot compensate for the shifting of the actual image.
- When you need to isolate a close object from its background the EVF allows you to preview the depth of focus before hitting the shutter button and get rid of the lens hood you see in the lower right corner of the OVF. This will always be your choice for portraits.
- When you need to stitch several images to create a wider angle shot of a close subject and precise framing is crucial. For e.g. when you like to capture long wall graffiti in a single shot.
If you like to check your exposure, contrast, colors in the viewfinder before pushing the button you will feel right at home.
Film SLR shooters never needed any control of exposure or colors in the viewfinder to create beautiful images. Colors were predetermined by the film`s color palette and exposure settings were critical only when you shoot slide film where you could burn the highlights of a high-contrast scene. Photographers back then (not the masses) knew what they were doing while today you pay premium to be saved the time learning the basics of photography.
Accurate auto-focus
Many of you might be aware that Fuji used to build excellent professional 6×4.5/6×7/6×9/6×17 medium format film rangefinders majority of which had no AF capabilities. A great exception was the 645GA models, known for their slow but reliable focusing system. Since the beginning of the new millennium Fuji introduced the “Finepix S Pro” series of DSLR cameras based on popular Nikon`s film SLR bodies. Besides the superb (even for today`s standards) sensors and image processors from Fuji these cameras also inherited the latest Nikon AF know-how at the time which guaranteed consistently fast and precise focus from shot to shot. Unfortunately (or not) after 2006 this unique collaboration between the two companies ceased and Fuji had to rely to its own AF magic for the introduction of the groundbreaking 1st model of the X100 series.
It seems that Fuji has gone a long way with their AF throughout the years since it is not only accurate but faster than it used to be on the mentioned earlier GA series rangefinders. “How fast?” you would ask immediately. Anywhere between Nikon F4 (1988) and high-end point & shoot camera of today. “Is that quick enough?”, you would continue. Hell yeah…this is a camera for zone focusing when shooting moving people in the streets and autofocusing for landscapes or any other relatively static object of interest. Don`t forget that film rangefinder users manually focus with such cameras, so in a way we must be grateful to even have an AF here. If you find yourself often in situations where speed is critical to nail the shot you must consider a bulkier DSLR or calm yourself that this camera used to cost 1200 USD and you get it now for 400$. Is it fast enough for 400$? Sure it is. Compared to a non-Af film rangefinders it is even lightning fast. It`s all about perception.
The optical viewfinder of any rangefinder (including X100) is basically a “hole” in the camera body with larger field of view than what the sensor sees through the lens and shows you on the LCD. Within the finder you have a white rectangle called a framelines which is 90% of your actual image. So when you compose your image make sure to include your major elements within this white rectangle (a.k.a framelines). Depending on the distance to your photographed subjects when you press the shutter button halfway your central AF point and white rectangle may move down and to the right to show you where the actual focus and image borders are as seen by the sensor.
The image bellow will be used for illustration on how to use the central focus point to achieve focus in the OVF when using Fuji X100 as a rangefinder. If you decide to compose trough the electronic viewfinder X100 behaves like a DSLR since you see through the lens and what you see in the EVF is what you will capture on the sensor, review on the LCD and record on the memory card.
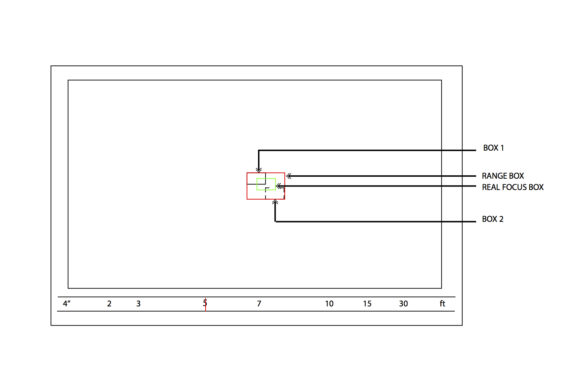
Image source: http://vopoku.com/fujifilm-ovf-focusing/
The central focus point (the solid BOX 1) of the OVF is naturally placed where you expect it to be. Whenever you focus on a subject or scene which is at least 9 meters away (a.k.a infinity) this will be your central focus point. As soon as your focus on subjects closer than 10 meters a green box will appear which will start to move down and to the right towards the dashed BOX 2, the closer you focus on. Should you reach the minimum focus distance of 80 cm your new (green) central focus point will overlap BOX 2. So, to sum it up…you can focus on any subject between 80cm to infinity (more than 9 meters) and this zone (between box 1&2) is called a focusing range.
Beside the central AF point, your white rectangle (framelines) may also shift its location. When the so-called “corrected framelines” are turned on you will be able to see how the white rectangle in the viewfinder (a.k.a framelines) moves down and to the right shrinking in size the closer you focus on. It is almost like switching from APS-H to APS-C size viewfinder when focusing distance changes drastically. If you are a landscape photographer you will never notice any movement of neither the AF point nor the white framelines.
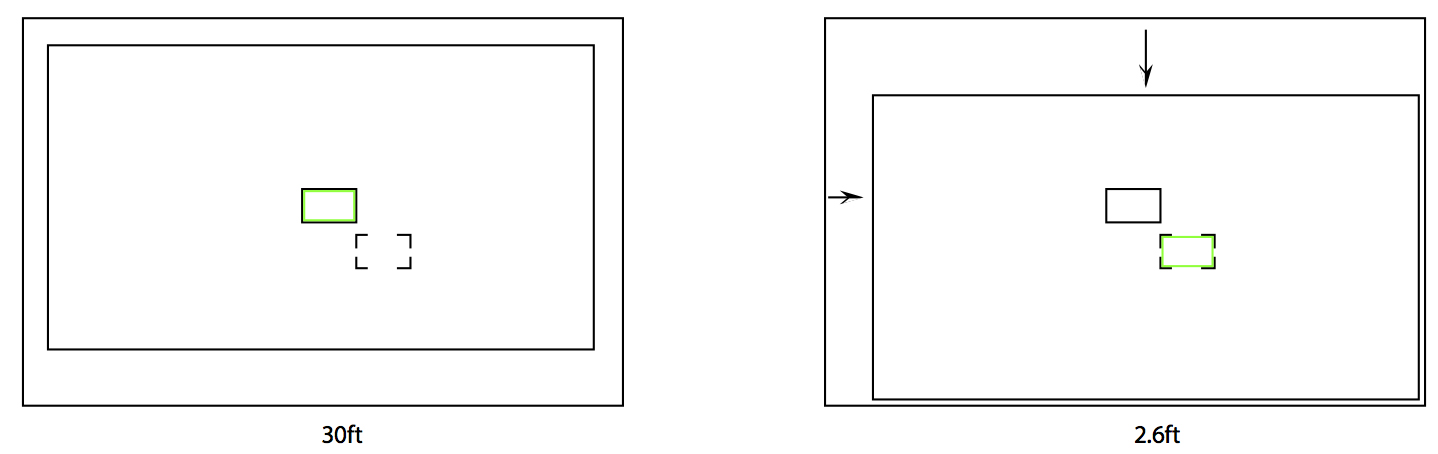
Image source: http://vopoku.com/fujifilm-ovf-focusing/
Creative use of corrected framelines in AF mode for planned shots in street photography
A great fun when shooting Fuji with corrected framelines turned on is that once you half-press the shutter button to focus on a nice background or static object (say graffiti wall, store window etc…) you can wait for interesting objects to enter the framelines. Remember that I mentioned earlier that the field of view of the OVF is much larger than the area within the white rectangle (framelines) which represents the borders of your actual image. So if you shoot in the streets, to the left of the white framelines you can wait for an interesting person, pet, object to add interesting contrast to you pre-selected background or if you shoot the sea, a yacht might be approaching the boarders of your white rectangle. Here is an example:

https://www.flickr.com/photos/stevensiegel/7676357750/in/album-72157684868549735/
If seeing central focus point and white rectangle (framelines) moving during focusing seems too disturbing or taking your attention away from the image you can turn them off and learn to use the so-called “zone focusing”. This is a quite popular technique in street photography where you set your camera so any subject between a certain range of meters is in focus.
Zone focusing in street photography
It is often used when shooting from the hip/waist level without looking trough the viewfinder. You take shots of people passing by in the street as your camera is hanging on your neck for example. You walk around, see an interesting person approaching, hit the shutter button and you capture the decisive moment. For this scenario rangefinders are much quicker than DSLRs since there is no shutter lag while even the best sports DSLR can take milliseconds longer to focus or do it on the wrong person and by then you have missed the shot. What`s more, with a DSLR you need time so the camera can refocus for the next shot and sometimes might even lock the shutter button if focus is not achieved quickly enough. With the zone focusing you do not care about speed of focusing since as long as the shutter button is pressed an image is always taken and everything in the pre-set range of meters (a.k.a “depth of focus”) will be in focus.
Zone focusing for night photography
In low light situations like parties, indoor sporting events, street light portraiture combining zone focusing with the excellent high ISO performance of X100 will allow you to shoot handheld with smaller apertures (deeper zone of focus). For night cityscapes and longer exposures the use of an ultra small and light tripod will contribute for sharper and noise-free images.
Zone focusing in landscape photography
Zone focusing is used quite often in landscape/cityscape photography as well. Should you have an image where an object of close proximity has to be in focus along with a distant but interesting background (beautiful scenery or buildings) you need to figure out how close to the foreground object you must be to keep the background reasonably sharp.By changing the aperture setting on the lens of X100 you can control the minimum and maximum distance between which you will have everything in focus. A smaller aperture number (e.g. f16) means wider zone (depth) of focus allowing you to focus on much closer situated foreground objects (while still keeping the background acceptably sharp) than you would by choosing a larger aperture number.
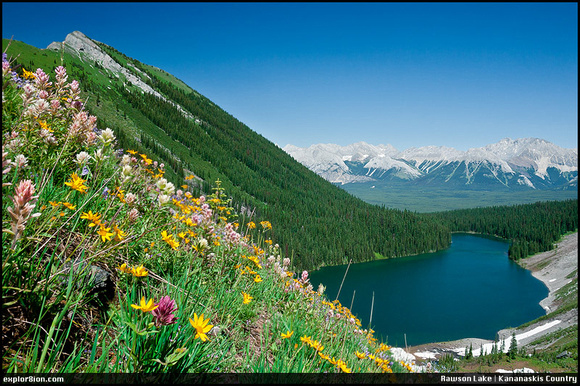
Zone focusing in landscape photography
Image source: http://www.explor8ion.com/photography/basics.html
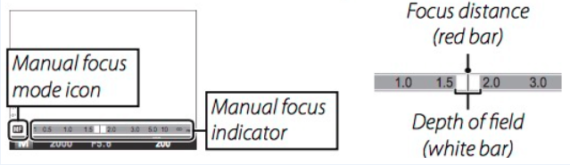
On the old manual focus lenses for film cameras the minimum focus distance for a chosen aperture was painted on the lens itself while Fuji calculates it internally and displays it in the viewfinder. When you enter manual focusing mode on X100 at the bottom of the viewfinder a blue ribbon will appear along with a white bar (see image below). The ribbon is a focal distance scale and the white bar is your current depth of focus. Start opening or closing the aperture and the depth of focus (the size of the white bar) will respectively increase or decrease. The beginning of the white bar will mark the minimum focus distance at which subjects will be in focus while the end of the bar stands for the maximum focus distance at which everything will be in focus. In the middle of the white bar there is a red line which marks the distance at which the focus will be most precise or in other words objects will look the sharpest.
The autofocus is handy for shooting relatively static objects in good light when you have the time to set your camera properly, think about your shot beforehand or have the time to try different angles. When you are out in the street where every second might provide an opportunity to quickly capture a candid moment then you need to pre-set the focus by using a chart (see the image below).
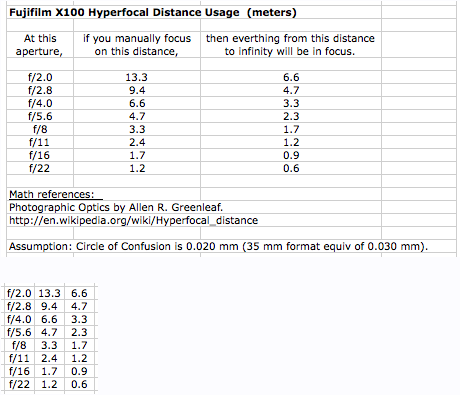
Do not let the term “hyperfocal distance”in the title of the table above make you scared. It is a fancy way of saying “the minimum focus distance” at which X100 (its lens) can be focused so that all objects from half of this distance till infinity will be in focus with acceptable sharpness. The second column of the table lists a set of minimum focus distances and the third one is the zone of available focus in front of our object (half the minimum focus distance).
How do you tell X100 to a choose a certain minimum focus distance that keeps the background sharp?
- Choose an object around you (for e.g. a street sign, trash can, store window etc…) and autofocus on it.
- Read the distance scale in the viewfinder to see how far from you and the camera this object is.
- Step forwards or backwards if correction is needed until you reach the minimum focus distance you desire.
- Press the AFL (AutoFocus Lock) button.
- Change the aperture to a desired number from the chart and start shooting.
You must know that within the area of focus not all objects will have the same sharpness. If you have focused at the minimum focus distance (from the chart above) then your foreground objects will be perfectly sharp but slowly towards infinity the sharpness (perfect focus) will decrease. So should the background sharpness is more important for your image than the foreground set the minimum focus distance a little further away from the foreground since half of this distance before it will also be in focus.
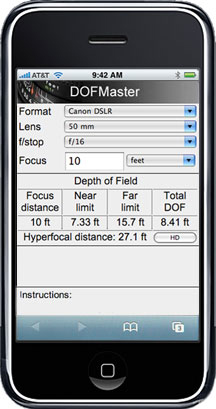
The f-number & minimum focus distance combinations presented in the table are general guidelines which apply to any APS-C sensor camera but with practice and depending on your composition needs you can use settings for minimum focus distance smaller than those in the table for a particular aperture. What will happen is that you will lose depth of focus till infinity and instead the maximum distance a subject or background will be in acceptable focus will decrease. The exact zone (depth) of focus can be pre-set with the help of the many available smart phone apps like “DoF master”.
If you are in nature for extended periods of time, don`t have another spare battery or for another reason it is not safe to bring your expensive phone with you you better always have a folded paper copy of such table in your gear bag or pockets. At some point you will memorize your most common settings and will not need the table at all. It will be quite liberating to know and feel that you will always have perfect focus and sharpness without waiting on the camera do do this job for you when even your eye and hand reflexes find it challenging to react quickly enough to the fleeting photo opportunities around us. This is where the cliché “rangefinder heaven” came from.
Wide, Fast & Sharp Lens
Field of View
The 23mm F2 lens has the same field of view as a 35mm lens on a full-frame sensor when photographer is using the electronic viewfinder mode. As we said earlier the physical size of the viewfinder and the LCD reflection in the half-mirror is roughly the same size as that of a 35 mm DSLR. There is no shifting of white framelines and “what you see is what you get!” in EVF mode. Basically despite the smaller size of the Fuji`s APS-C sensor you still enjoy a full frame view inside the EVF screen. Logically, when you use the optical viewfinder its field of view is constant but always larger the the 35mm field of view of the lens presented within the white framelines (the actual image). You can also think of it as “the larger FoV of the OVF includes the smaller FoV of the lens at all times”.
The 35 mm field of view of Fuji X100`s lens also corresponds to the field of view of the human eye when you observe the scene with your both eyes open. Being not too short, not too wide and having no visible distortion made this viewing angle a favorite for movie directors and photo journalists. It allows them to be part of the scene (the action), get close to the main objects, include the interaction among them and much of the background without the need to ever step back. These benefits can find application also in wedding photography, portraiture, event photography etc.
The more you use X100 as a DSLR (in EVF mode) the more you will train your brain to notice interesting image opportunities by visualizing the viewfinder borders subconsciously as you explore the world around you and raise the camera only to take the shot. The prime lens will teach you to move around, change the height and angle from which you take photos, include or exclude elements in and out of the image frame or put in fewer words, to stop being lazy.
Advantages of a prime lens:
The largest aperture of the lens is F2 which makes it perfect for background isolation and low light handheld shooting. Inexperienced users may complain that the lens is not fast enough but in reality an even larger f-stop could have meant a bigger front element and image correcting lens in between which would have made the lens much bigger and kill the whole idea of traveling light. The small size is an advantage also since people tend to be more relaxed when posing in front of a small camera and lens and this could be seen in the images afterwards.
The lighter the lens, the better the chances you will have the camera with you more often, you will make more pictures, have more keepers, improve your photography skills.
Fuji 23mm f2 Sharpness
Sharpness-wise the lens will outperform all Canon and Nikon wide zooms for the same focal length and allow you to shoot at 2 times lower ISO and faster shutter speeds due to its faster lens. Most Canikon pro zooms have maximum aperture of 2.8 and besides being super heavy will cost you several times more.
You will create awesome images wide open with more than you need sharpness in the center portion of the image, where your main objects must be for a strong composition. Corners will be sharp enough for an area of the image where sharpness is not needed and major elements of the image are avoided. It is well known than many award winning images have deliberately darkened corners (a.k.a vignetting), so corner sharpness is never a factor in creating a good image.
Only lens designers and inexperienced photographers can find lens imperfections wide open by using it the wrong way. The right condition to shoot f2 is in dim light or at night. No one shoots close objects or head shots at f2 in broad daylight since depth of field is limited, camera and subject motion may occur or slight barrel distortion may affect facial features and straight lines close to the corners. If you stitch images for panoramic shots where perfect sharpness across the frame is crucial simply stop down the aperture to f4 or 5.6.
Image quality from this lens is often compared to Leica`s M- Summarit f2.5 since both lenses` bokeh, color and detail is similar. Leica`s lens costs 1700 USD while you get the Fuji glass basically for free which alone makes this camera system a great buy.
Vibrant Colors
If so far you have been a sworn RAW shooter who needed to spend time editing each and every shot before posting on social media or your own website X100 will change your world overnight. “WOW, wow, wow…” will come out of your mouth the first days when reviewing your images on your desktop screen. Colors are so vibrant straight out of the camera and subjects photographed seem to pop out of the images even without a shallow depth of focus (blurred background).
Following the legacy of Fuji`s own EXR sensors in the past which were famous for its color reproduction, natural skin tones and large DR Fuji managed to get the same results even from a regular Bayer CMOS sensor which was implemented 2 years earlier in Nikon D90. Camera owners and review websites kept repeating how close the IQ of X100 files were to Leica M9 in terms of sharpens, Nikon D3x in terms of dynamic rage or Nikon D3s in terms of low noise at high ISO. Quite an achievement for a 450 USD camera nowadays!
There are several things that must be taken into account to explain what your eyes see when reviewing the images. One is the AA filter which appears to be rather weak which allows for extracting extra detail much needed for landscape photography. Unlike most pro DSLRs from Canikon where you need to dial exposure compensation for shots in bright daylight Fuji underexposes just enough so you keep the important details in you jpeg files and nicely boosts the overall contrast of the images. All this is quite obvious in B&W images where you have the feeling of looking at contact sheet film. You are overwhelmed by the seen detail and texture everywhere.
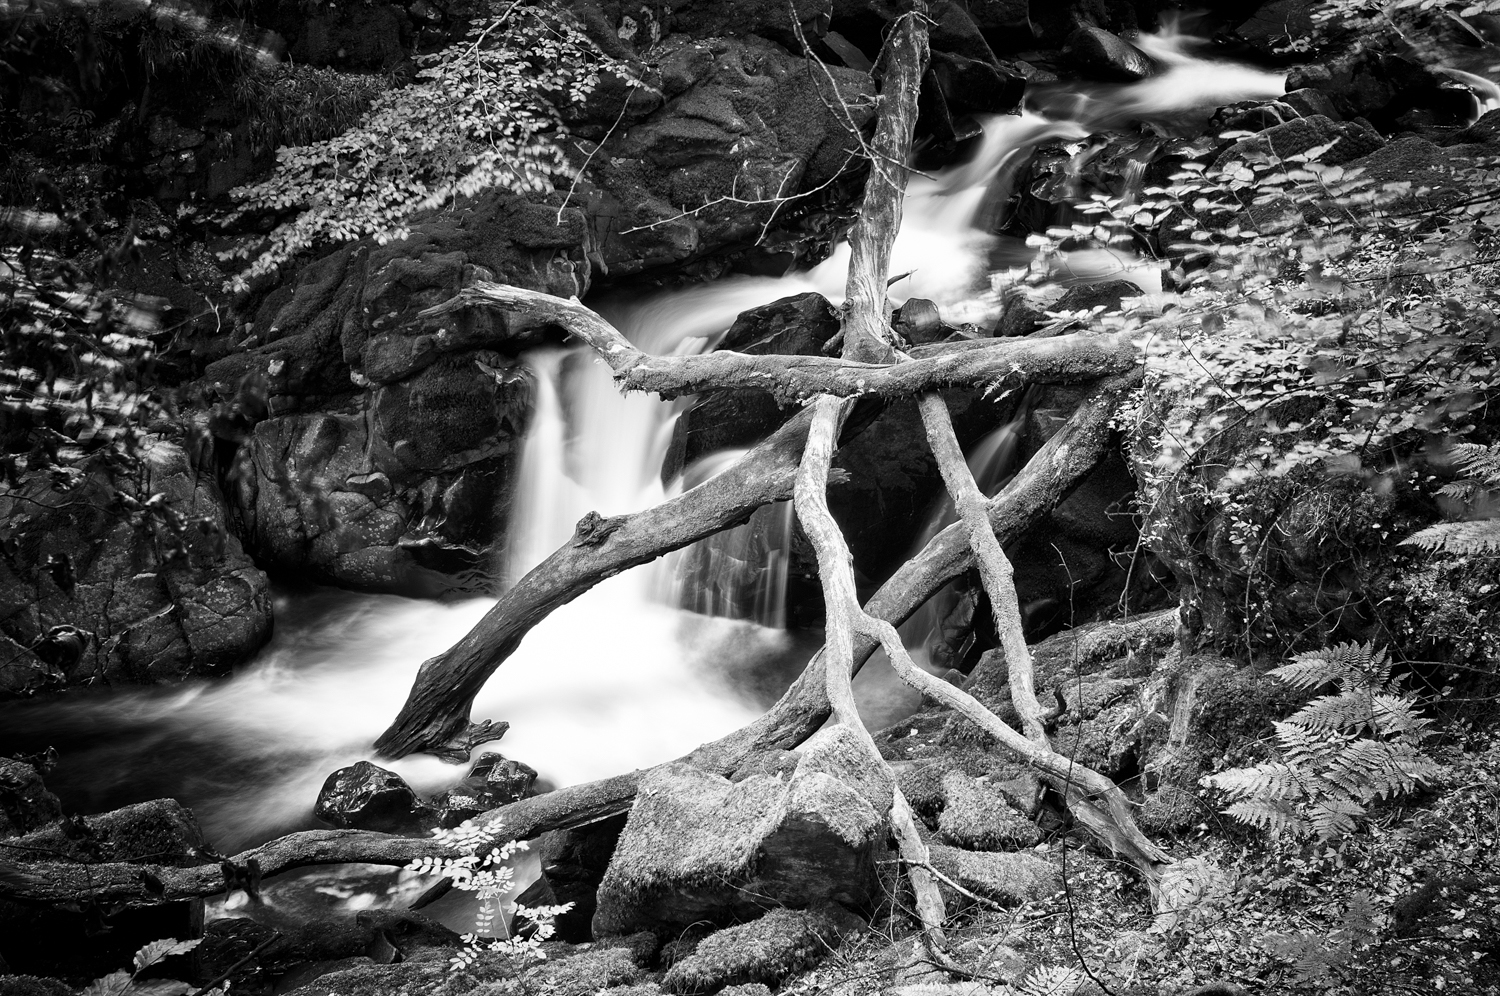
Image source: https://matthewhartphotography.files.wordpress.com/2015/02/dsf1134-edit.jpg
Part of the color magic stems from the Astia film simulation mode. It warms up your images, creates fantastic skin tones, vibrant greens and sky blues that will make you forget having a RAW file available. Images are so well exposed in any light, especially indoors or with backlit objects (person with the sun behind it), and keep their colors rich even at the highest ISO.
Would like to warn you that colors of your files will not be one-to-one perfect replica of the actual world you observe. They are enhanced deliberately in a way that they look saturated yet natural and the whole scene you captured will have a certain nostalgic feeling to you, as if you shot on Kodachrome film with “Velvia-like” punchy colors. These characteristics are missed now by many since Fuji created X-Trans sensors for their rangefinder series (X100s/t and X-Pro1/2) known for more subtle colors and colder images.
If you get bored by Fuji`s JPG perfection or feel like exploring different colors renditions of image objects you can still play with the RAW files which will offer you more headroom for color and exposure corrections. If feeling even more curious you can buy a Fujifilm Velvia 50 film and a compact film camera like Olympus OM1 and enjoy bigger viewfinder and better colors for landscape photography.
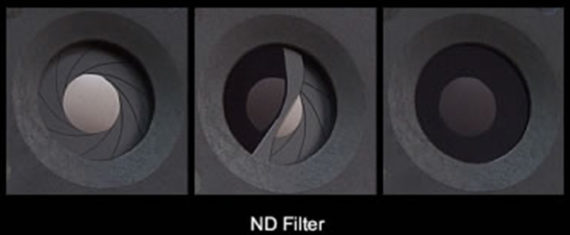
Built-in ND Filter & High-Sync Flash
A sheet-type premium quality actual ND filter (not a software trick) is built into the lens. It is placed behind the first two lens elements and in front of the leaf shutter and the aperture blades. It could be switched on/off either through the back screen menu or more conveniently you can set the Function button (Fn) on the top panel of X100 to play this role. Press the button while looking trough the electronic viewfinder or your LCD and you will notice how your exposure settings and overall image brightness change.
Below you can see an example of how an ND filter is implemented in a small digital compact:
Although a separate screw-in ND filter is about 25 USD/EURO due to the low diameter of rangefinder lenses having one integrated in the camera will speed up your workflow significantly since it will save you the time to take it out of you your bag/pockets and place it in front of the lens or mount it on a filter adapter alone or stacked with a polarizer.
Here are the two most popular situations where you can use the built-in ND filter of X100:
- Daylight portrait situations at f2
When out in the hot blazing sun (think about parties, weddings, the beach…anywhere) and you badly need a shallow depth of focus for better subject and background separation without risking to overexpose your images. There you go – you have the solution right out of the box! Should the sun happen to be straight behind your subject for some of your candid photos you can do two things. Either use software like OnOne Photo RAW to brighten the underexposed foreground without loss of image quality (due to the incredible dynamic range of the sensor) or use fill flash set on -⅔ stop. The ND filter will allow you to use a synch speed of 1/8000 sec at f2 which is incredible. You can do f2 portraits in bright light with a DSLR but the whole package (camera body, lens and filter) will be much more expensive, heavier and you will miss the fill flash sync speed which is in this case will be limited to mere 1/250 sec on the top-tier models.


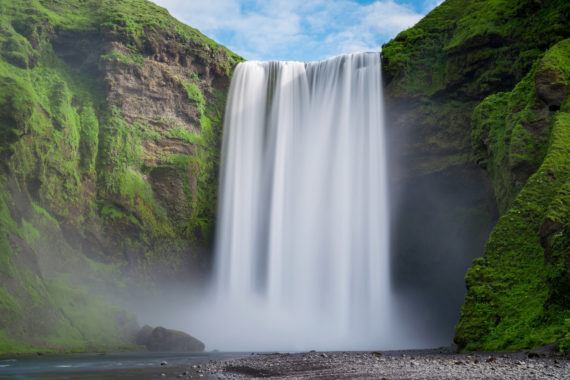
2. Long exposures on tripod in daylight
3 stops light stopping for 2-3 seconds exposure time is usually enough for having the effect of a flowing instead of a “frozen” stream of a river or a waterfall. Trough a ring adapter you may also add an extra 2-stop ND filter and get the capabilities of a denser 5-stop ND filter in total. This will allow you to capture the movement of the clouds across the sky. Being more creative you can pose your friends in the middle of crowded street or square and fire the fill flash to freeze them while all passing strangers are eliminated from the image or ghosted out.
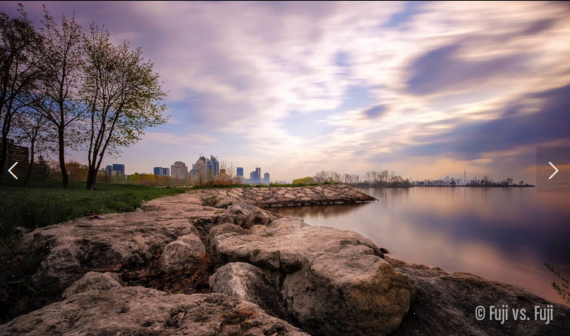
Source: https://www.fujivsfuji.com/
Silent (Leaf) Shutter
In the way it is built and works a leaf shutter resembles the iris of the human eye. It combines several blades which open and close making a circular shape, a feature also characteristic for the aperture diaphragm structure. DSLRs on the other hand have the so-called focal plane shutters with 2 curtains and a narrow vertical opening that travels from left to right to expose the whole image frame equally with light. It takes 3 times longer for top DSLR shutters to expose the image area compared to a leaf shutter of X100. This leads to a much faster flash sync speed of 1/1000th of a second at f2, making it easier to use fill flash in full sunlight. If you attach a small external flash like Sunpak PF20XD you can reach sync speed of 1/4000 sec.
Since the shutter is not built into the camera body there is no sound associated with shutter release and movement of a mirror. The silent operation is beneficial when shooting in churches, museums, theaters or institutions where the “click” noise will interfere with the activities of the people photographed. This leads to more natural results (facial expressions) of the people photographed since they are unaware of you taking pictures.
Due to the to leaf shutter design the following maximum shutter and aperture combinations can be used when the ND filter is off: